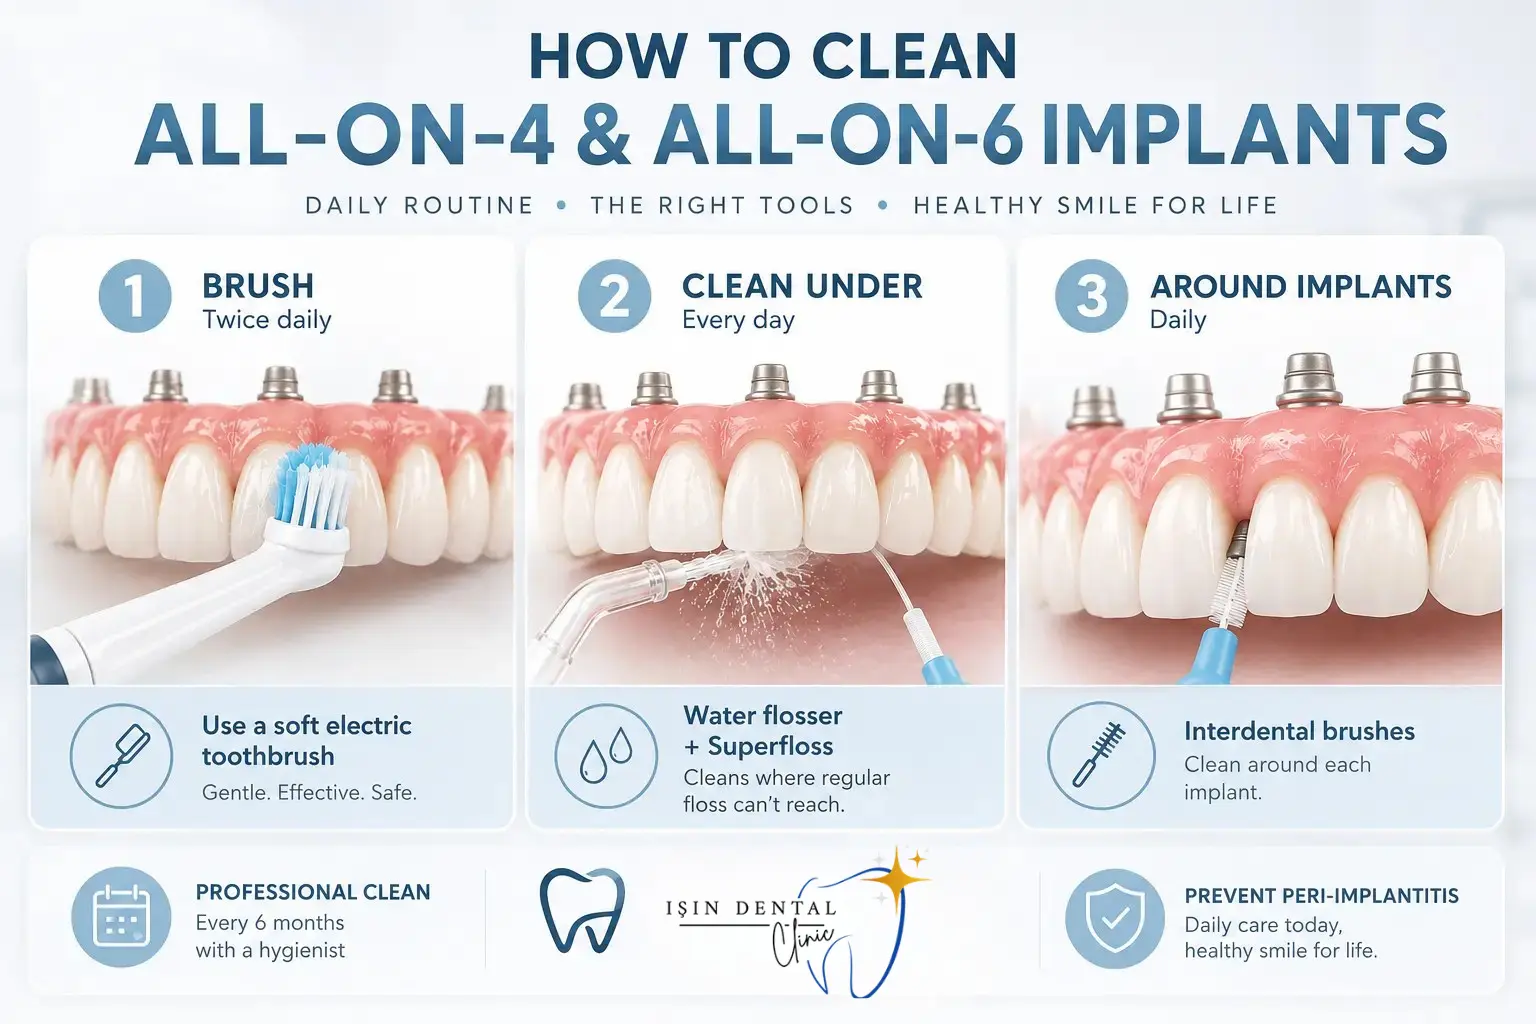
All-on-4 and All-on-6 implants are cleaned in three steps every day: brush twice daily with a soft or electric brush, flush underneath the bridge with a water flosser, and clean around each implant with superfloss or an interdental brush. Add a professional hygienist visit every six months. The bridge itself cannot decay, but the gum and bone holding your implants can become inflamed and recede, and that condition, peri-implantitis, is the main reason full-arch implants fail. It is almost entirely preventable with the routine below.
Patients often assume that fixed teeth mean the end of dental homework. The opposite is true. The cleaning is different from what you did with natural teeth, and the part that matters most, the space underneath the bridge, is the part a normal toothbrush never touches.
| When | What to do | Tool |
|---|---|---|
| Morning | Brush all surfaces, 2 minutes | Soft or electric brush |
| Morning | Flush along and under the bridge | Water flosser |
| Evening | Brush all surfaces, 2 minutes | Soft or electric brush |
| Evening | Thread and draw under the bridge | Superfloss |
| Evening | Clean around each implant | Interdental brush |
| Evening | Rinse | Alcohol-free mouthwash |
| Every 6 months | Professional clean and check | Hygienist |
Use a soft manual brush or an electric brush with a soft head and a pressure sensor. Clean the outer surface, the biting surface and the inner surface facing the tongue, giving the same time to each. Then angle the bristles up towards the join between the bridge and the gum and work slowly along the arch.
Pressure is the common mistake. Harder brushing does not clean better, it irritates the gum around the implants and can scratch acrylic. Let the brush do the work. Two full minutes, twice daily, is the target.
A water flosser is not optional with a full arch, it is the tool that reaches what nothing else can. Use it once a day, morning or evening, whichever you will actually keep up.
- Fit the orthodontic or plaque-seeker tip rather than the standard jet
- Start on the lowest pressure setting and increase gradually over the first weeks as the tissue toughens
- Lean over the sink, put the tip in, then switch it on, otherwise you will redecorate the bathroom
- Angle the stream upwards into the gap under the bridge, not straight at the gum
- Trace slowly along the whole arch, outer side then inner side, roughly 30 to 45 seconds per arch
- Warm water is more comfortable than cold if the tissue is sensitive
Any reputable brand with adjustable pressure will do. Daily use matters far more than which one you buy.
Superfloss has a stiffened end that threads under the bridge, a spongy middle section that scrubs, and normal floss at the other end. Thread the stiff end between the bridge and the gum, pull it through, then draw the spongy section side to side along the underside. Work through the arch in sections. This is what lifts the film that water alone leaves behind.
Interdental brushes handle the spaces around each implant abutment. Use the size your hygienist gives you, insert gently without forcing, and replace the brush when the bristles splay. If a size that used to fit suddenly feels loose, mention it, because it can mean the gum has receded.
An alcohol-free daily mouthwash is the right choice. Alcohol dries the soft tissue and can dull the surface finish of the prosthesis over time. Rinse after mechanical cleaning, never instead of it, because no mouthwash removes established plaque.
Chlorhexidine deserves a specific note. It is very effective against inflammation and we prescribe it in short courses, typically one to two weeks. It is not a daily rinse, because prolonged use stains teeth and prosthetics and alters taste. Use it when we tell you to and stop when the course ends.
- Hard-bristled brushes and heavy scrubbing pressure
- Whitening or abrasive toothpastes, which scratch acrylic and will not lighten a prosthesis anyway
- Metal picks or anything sharp near the implant surface
- Baking soda and other homemade abrasive pastes
- Smoking, which is the single biggest risk factor for peri-implantitis
- Opening packaging or biting nails with your bridge
- Skipping hygienist visits because nothing hurts, since bone loss around implants is painless until it is advanced
Immediately after placement you follow the surgical instructions we give you, not the routine above. Brush the rest of the mouth normally from day one and keep the surgical sites clean with the prescribed rinse. Gentle brushing around the temporary bridge usually begins after about a week, and the water flosser is introduced once healing has settled, typically at two to three weeks.
Your timeline is set by your surgeon and by how your tissue is healing, so follow the dates you were given rather than a general guide.
A hygienist uses instruments designed not to scratch titanium and can reach and see what you cannot. They will measure the tissue around each implant, spot early inflammation, and adjust the interdental brush sizes you should be using. Once a year your dentist may unscrew a screw-retained bridge entirely for a deep clean underneath, which is a genuine advantage of that design and one we cover in our article on screw-retained versus cement-retained implants.
Smokers, diabetics and anyone with a history of gum disease should go every three to four months instead of six.
Contact us as soon as you notice any of these rather than waiting for a scheduled visit.
- Bleeding when you brush or floss, which is the earliest and most reversible sign
- Gum around an implant that looks red, swollen or shiny
- A persistent bad taste or odour that cleaning does not clear
- Any looseness or clicking in the bridge, or a screw that feels like it has moved
- Pain, pressure or tenderness months after healing finished
- Gum pulling back so that a metal edge becomes visible
Early peri-implantitis caught at the bleeding stage is usually reversible. Caught after bone loss, it is not.
Travelling for treatment does not mean you are on your own afterwards. Book a hygienist near home for your six-month visits and keep us in the loop, since we can send your treatment records and implant details to any dentist who asks. If something concerns you, send us photographs and we will tell you whether it needs attention where you are or a return visit.
You can read more about the treatments themselves on our All-on-4 and All-on-6 pages, and compare the two in our guide on All-on-4 vs All-on-6.
How do you clean under an All-on-4 or All-on-6 bridge?
The gap between the bridge and the gum is cleaned daily with a water flosser aimed along the length of the arch, followed by superfloss threaded underneath and drawn side to side. Interdental brushes clean around each implant abutment. Ordinary floss cannot reach this space, which is why a specific routine is needed.
What is the best water flosser for All-on-4 implants?
Any reputable water flosser with an adjustable pressure setting works. Use the orthodontic or plaque-seeker tip rather than the standard jet, start on the lowest pressure and build up as the tissue toughens. The tool matters far less than using it every single day, angled up under the bridge rather than straight at the gum.
What is the best mouthwash for implants?
An alcohol-free daily mouthwash is the sensible choice, because alcohol dries the tissue and can dull the finish on the acrylic. Chlorhexidine is highly effective but is a short-term prescription rinse for inflammation, not a daily habit, since it stains with prolonged use. Mouthwash supports mechanical cleaning and never replaces it.
Can you use an electric toothbrush on All-on-4 implants?
Yes. An electric brush with a soft head and a pressure sensor is our first recommendation, because it removes plaque more effectively and stops you scrubbing too hard. Avoid hard bristles and heavy pressure, both of which irritate the gum around the implants and can scratch the prosthetic surface.
How often should All-on-4 implants be professionally cleaned?
Every six months for most patients, and every three to four months for smokers, diabetics or anyone with a history of gum disease. The hygienist uses instruments that will not scratch the implant surface and can see early inflammation you cannot. This appointment is the single most valuable thing you can do for the lifespan of your implants.
Can the All-on-4 bridge be removed for cleaning?
A screw-retained bridge can be unscrewed by your dentist for a deep clean, usually done annually or when a problem is suspected. It is not removable by you at home, and it should not be. Daily cleaning is done with the bridge in place, which is exactly what the routine in this article is designed for.
What is peri-implantitis and how do I avoid it?
Peri-implantitis is inflammation around an implant that progresses into loss of the supporting bone, and it is the leading cause of implant failure. It is driven by plaque left undisturbed under and around the bridge. Daily cleaning under the prosthesis, stopping smoking and keeping regular hygienist visits prevent it in the great majority of cases.
Do implants get cavities?
No. Titanium implants and the ceramic or acrylic bridge cannot decay, which is why some patients wrongly assume cleaning matters less. The risk simply moves from the tooth to the gum and bone. Losing an implant to peri-implantitis is considerably more serious than a filling, so the cleaning routine matters more, not less.
How soon after surgery can I start cleaning normally?
Brush the rest of the mouth from day one and keep the surgical sites clean with the rinse we prescribe. Gentle brushing around the temporary bridge usually starts after about a week, and the full routine with a water flosser begins once healing is settled, typically at two to three weeks. Follow the timeline your surgeon gives you.
What are the warning signs I should not ignore?
Bleeding when you clean, gum that is red or puffy around an implant, a persistent bad taste or odour, a screw or bridge that feels loose, and any pain or pressure months after healing. Bleeding is the earliest sign and the easiest to reverse. Contact us as soon as you notice any of them rather than waiting for your next check-up.
Last of all, keep it simple enough that you will actually do it. Brush twice, flush under the bridge once, thread the floss through at night, and see a hygienist twice a year. That is the whole routine, and it is the difference between implants that serve you for decades and implants that quietly lose bone. If anything about your bridge concerns you, send us photographs through our free online consultation and we will tell you honestly whether it needs attention.